
Fix issues when you can't sync OneNote
Sorry that you're having trouble syncing your OneNote, follow the troubleshooting steps below.
First check for and install any available Office updates for your computer.
OneNote automatically synchronizes shared notebooks. If you're having sync issues, here are some fixes:
Set notebooks to sync automatically:
-
Select the File menu and choose Options.
-
Select the Sync tab and check the box next to Sync notebooks automatically.
Manually sync notebooks:
-
Select the File menu and on the Info tab, select

-
In the Shared Notebook Synchronization dialog box that appears, do one of the following:
-
Select Sync All to sync all of your shared notebooks.
-
Select Sync Now next to a specific notebook to sync only that notebook.
If you still have sync issues and your notebook is stored on OneDrive or on newer versions of SharePoint, try opening the notebook at www.onenote.com to help determine if the problem is caused by the server or by OneNote.
If you're having trouble seeing recent changes when using OneNote on multiple devices, or if your notebook is showing a sync error, try the following:
-
Verify that your computer or device has good internet connectivity. A reliable connection ensures that notes can sync quickly and successfully across devices.
-
If your notebook is stored on OneDrive, check our Service Health status page for any outages. If OneDrive is currently having issues, OneNote may be affected as well.
-
If your notebook is stored on SharePoint, you'll need to contact your administrator to report, confirm, and troubleshoot any issues.
Warning: While troubleshooting sync issues, signing in or out of OneNote (or removing and reinstalling the app) is not recommended, as this could result in data loss.
If your notebook that's experiencing a sync issue is stored on OneDrive or on newer versions of SharePoint, can try opening the notebook in your browser at www.onenote.com. This can help to determine whether it's an issue with a specific PC or device, or if something else is happening behind the scenes.
Do the following:
-
In the OneNote desktop app, select File.
-
On the Info tab, right-click the URL shown immediately below the name of the affected notebook, and then click Copy.
-
In your web browser, select the address box, and then press Ctrl + V on your keyboard to paste the copied URL.
-
Press Enter to open the notebook in OneNote for the web.
Note: Depending on the size of the notebook and the type of Internet connection you're using, it may take a while to load and sync all the notebook content.
If you're able to open and view the notebook in your web browser, check its contents for your most recent changes. If you're still seeing an older version of your notes, verify that the PC or device that the latest notebook changes were made on was able to completely finish syncing your notes.
Do the following:
-
Open the OneNote desktop app on the PC or device where you last edited the most recent version of your notebook.
-
Select File > Info > View Sync Status.
-
In the Shared Notebook Synchronization dialog box that opens, check for any error code and message displayed for your notebook, and then check the list of error codes elsewhere in this article for a matching result and recommended steps.
Note: Some error codes may display a "Get Help" button next to the error. Select the button to open a troubleshooting article specific to that error, and then follow its recommended steps.
In some situations, closing and reopening the affected notebook can help reset the sync connection between the OneNote app and the OneNote service.
Warning: Before closing and reopening notebooks that aren't fully synced across all your devices, make sure you copy and back up any unsynced recent notes on the originating PC or device.
To close and reopen a notebook, do the following:
-
In the OneNote desktop app, select File.
-
On the Info tab, right-click the URL shown below the name of the affected notebook, and then select Copy.
-
Next to the name of the affected notebook, select the Settings button, and then select Close.
-
In your web browser, select the address box, and then press Ctrl + V to paste the copied URL.
-
When the notebook opens in OneNote for the web, select Open in Desktop App on the ribbon to re-open the notebook in the OneNote desktop app.
There may be times when your shared notebook is syncing normally, except for one of its sections or pages. You can verify this by doing the following:
-
In the OneNote desktop app, select File > Info > View Sync Status.
-
In the Shared Notebook Synchronization dialog box that opens, select any notebook icon with a yellow triangle warning icon over it to see the name of any section that's causing sync problems.
-
Select the Sync Now button next to the notebook containing the section.
Individual notebook sections can occasionally stop syncing properly. If you have a single section whose pages aren't syncing with the rest of an otherwise up-to-date notebook, you can try the following workaround:
-
In the OneNote desktop app, create a new section within the same notebook.
-
Copy (but don't move) all of the pages from the old section into the new one that you just created. You can do this by right clicking each page, and then selecting Move or Copy.
-
When all of the pages have been copied to the new section, press Shift + F9 to manually sync the notebook. If a progress bar appears, wait for it to finish.
If following these steps successfully syncs the pages in the new section that you created, you can safely delete the old section and then continue working in the new. After the old section is deleted, you can rename the new section to the same name as the deleted section.
If these steps don't work, section sync errors or problems can also be caused by a corrupted section located in the Notebook Recycle Bin. If you no longer want that section, you can delete it from the Recycle Bin to stop the error:
-
In the OneNote notebook, select the History tab, and then select the Notebook Recycle Bin.
-
Right-click the section (or page) and choose Move or copy.
-
You can also Copy and Paste the pages or content in the section to another page or section. Once that's done, you can delete the original section or page.
Version conflict messages typically appear if you and another user attempt to edit the same part of a page, such as changing the same paragraph of notes, at the same time. When this happens, OneNote creates multiple copies of the page to avoid data loss and an error message appears on the yellow Information bar. You will see an icon on a page that has the conflict.
To fix merge conflicts, do the following:
-
Select the yellow Information bar at the top of your page to view a page that lists the conflicting changes (highlighted in red).
-
Copy information from the page with the merge conflicts error and paste the changes into the main page, if necessary.
-
When you finish incorporating any changes, delete the conflicts page by right-clicking its page tab and then selecting Delete on the shortcut menu.
Server is busy errors are typically seen when notebooks are stored in SharePoint, SharePoint Online, or OneDrive for Business. Even though they may seem to be sync errors, most are actually authentication errors that can be fixed by following one of these methods:
-
Sign out and sign in to OneNote.
-
Close and then re-open the notebook.
-
Check to make sure you have access to the notebook via OneNote for the web (at www.onenote.com), SharePoint, or SharePoint Online.
Some errors, such as 0xE00015E0, indicate there's not enough space on the device or notebook to sync a section. This may be caused by large backup files. To solve these sync issues, you can optimize, or delete existing notebook backups.
Optimize OneNote notebook
-
In OneNote, select File > Options.
-
In the Options dialog, select Save & Backup.
-
Select Optimize All Files Now. It may take a while to optimize the files.
You can also adjust the Number of backup copies to keep option in the same Save & Backup location to a lower number to save space.
Delete existing backups
-
Open File Explorer.
-
In the navigation bar near the top of the window, type %localappdata%, and press Enter.
-
Open the Microsoft folder and then open the OneNote folder.
-
Open the 16.0 folder, then open the Backup folder.
-
Delete the files or folders you no longer wish to save in the Backup folder.
If you get one of these errors, you should follow the steps in the related article:
Here are some of the more common "service not available" errors you may experience, along with links to troubleshooting articles for those errors:
Misplaced sections appear in a notebook when OneNote tries to sync changes to a notebook section, but can't find the section file. To resolve the issue, you can delete the section from your notebook or move it to another notebook. For more information, go to this article:
If you have OneNote notebooks on SharePoint, you'll notice that they're typically stored in Document Libraries. If the SharePoint Library you're using has certain properties enabled, it could cause sync errors. For more information, read the following articles:
Sync problems in the collaboration space may occur if a number of students try to edit the same page location at the same time or if a large file attachment is added on the edited page. There are some best practices you can follow to avoid these sync issues:
-
Separate students into small groups of up to 6 students.
-
Create a separate "section tab" for each group of students. For example, if there are 4 groups of 6 students, create 4 tabs.
-
Have each student create their own page or have each of them edit in different places on the page.
-
Avoid adding big file attachments.
OneNote Diagnostics Tool
You can also use the OneNote Diagnostics Tool to collect diagnostic information for your installed version of OneNote and then send the information securely to Microsoft for troubleshooting.
Note: The OneNote Diagnostics Tool is currently only available in English. We'll update this page when additional languages become available.
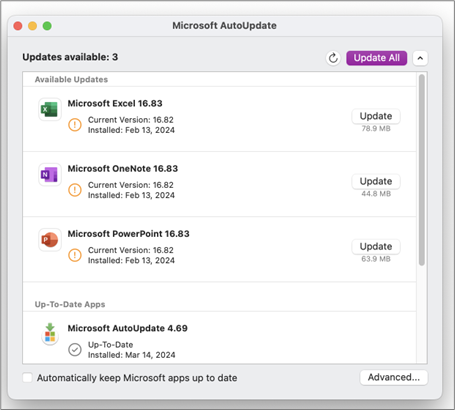
First check for and install any available Office updates for your Mac.
OneNote automatically synchronizes shared notebooks. You can sync manually any time:
-
In the

-
Press control+click on the name of the notebook.
-
On the menu that appears, select Sync This Notebook.
If the notebook that won't sync is stored on OneDrive or on newer versions of SharePoint, try opening the notebook in OneNote for the web (at www.onenote.com). This can help determine if the problem is caused by the server or by OneNote.
-
On the toolbar in OneNote for Mac, select Notebooks > Notebooks > Copy Link to Notebook.
-
In your Web browser, select inside the address box, and press Command + V to paste the copied URL.
-
Press Enter to load the notebook in OneNote for the web.
If you're able to successfully open the notebook in OneNote for the web and the changes appear, the problem may be caused by OneNote for Mac. Closing and re-opening the notebook there usually clears and successfully resets the connection. Follow these steps:
-
On the menu bar in OneNote for Mac, select Notebooks > Notebooks > Close This Notebook.
-
Switch back to the notebook in OneNote for the web in your Web browser, and then select Open in OneNote on the ribbon.
Important: Depending on the notebook size and type of Internet connection you're using, it may take a while to sync all the notebook content over to OneNote for Mac.
If you're unable to open and view the notebook in OneNote for the web, the source of the sync problem is likely with your server. If your notebook is stored on OneDrive, check our Service Status page for any known interruptions or outages. If your notebook is stored on SharePoint, you'll need to contact your administrator to report and troubleshoot the problem.
If you're able to open and view the notebook in OneNote for the web, but can't see the changes, the information hasn't yet synced. You can check the sync status for any specific errors by doing the following:
-
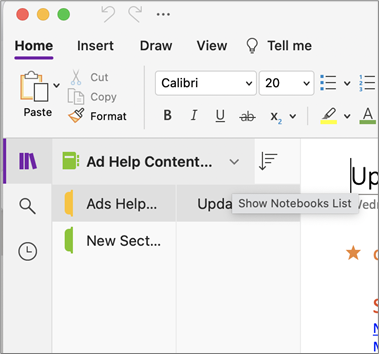
Select the Show Notebooks button

-
Move the mouse pointer over the warning triangle icon that appears next to the name of any notebook in the list, and then note any error code that may be displayed in the tooltip that appears. You can look for additional documentation about known errors elsewhere in this article, or scroll to the end of this page for details about how to contact the OneNote product team for help with undocumented issues.
If you receive an error when OneNote is trying to sync, such as "Can't sync <section name> or <notebook name>" or if there is an error icon next to your notebook name, try the following steps to resolve the issue:
-
Select the Show Notebooks button to see a list of your notebooks.
-
Select the name of the notebook with sync issues to open it.
-
Create a new section in the same notebook.
-
Copy (but don't move) all of the pages from the old section into the new one you just created.
-
When all the pages have been copied to the new section, select File > Sync All Notebooks.
Next, check to see if the notes you copied also have trouble syncing or if it's only the original section that's still affected.0xE4020045: Resolve the 0xE4020045 (Unsupported Client) error in OneNote
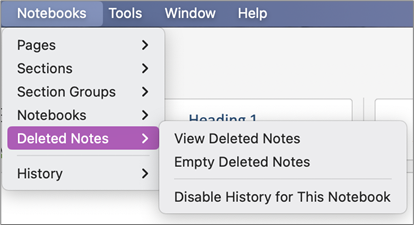
If these steps don't work, sync errors in can also be caused by any corrupted notes located in Deleted Notes. If you're sure you no longer need such notes, you can delete them from the Recycle Bin to stop the errors:
-
In the OneNote notebook that has sync issues, select the Notebooks tab, select Deleted Notes, and then select View Deleted Notes.
-
For each item in this view, Control-click the name of the note, and then select Restore to.
-
Choose the notebook to which you want to restore the deleted notes to, and then select Restore.
-
Once a note has been copied to another notebook, you can delete the original note in the Deleted Notes view by Control-clicking the name of the note and selecting Delete Permanently.
Version conflict messages typically appear if you and another user attempt to edit the same part of a page, such as changing the same paragraph of notes, at the same time. When this happens, OneNote creates multiple copies of the page to avoid data loss and an error message appears on the yellow Information bar. You will see a warning icon on any page that has a conflict.
To fix merge conflicts, do the following:
-
Go to the page with the merge conflicts error, select anywhere on the page, and then select Edit > Select All on the menu bar.
-
On your keyboard, press Command+C to copy the selection.
-
Go to the main version of the page, select where you want to append the information, and then press Command+V to paste the copied content.
-
When you have finished reviewing sync conflicts and have made any necessary changes, you can delete the page with the errors by selecting the Delete Version button on the yellow Information bar.
"Server is busy" errors are typically seen when notebooks are stored on SharePoint, SharePoint Online, or OneDrive for Business. Even though they may seem to be sync errors, most are actually authentication errors that can be fixed by following one of these methods:
-
Sign out of OneNote and then sign back in. On the menu bar, select OneNote > Sign Out. When you have successfully signed out, select OneNote > Sign In.
-
Close and then re-open the notebook. On the menu bar, select File > Close This Notebook. To reopen the notebook, select File > Open Recent, and then select the notebook you want to re-open.
Alternately, you can check to make sure you have access to the notebook via OneNote for the web. Do the following:
-
On the menu bar, select Notebooks > Notebooks > Copy Link to Notebook.
-
In your Web browser, select the address box, and then press Command+V to paste the copied URL.
-
Press Enter to load the notebook in OneNote for the web.
If you're able to successfully open the notebook in OneNote for the web and the latest changes appear, then the problem may be caused by the Mac version of OneNote. Closing and re-opening affected notebooks usually clears and successfully resets the connection.
Misplaced sections appear in a notebook when OneNote tries to sync changes to a notebook section, but can't find the section file. To resolve the issue, you can move the section to another notebook or delete the section from the current notebook.
To move a misplaced section to another notebook, do the following:
-
Control-click the name of the misplaced section, and then select Move Section To.
-
Select the notebook to which you want to move the section, and then select Move.
To delete a misplaced section from your notebook, do the following:
-
Control-click the name of the section you want to delete, and then select Delete Section.
Caution: Deleting sections cannot be undone. When you delete a section, you also permanently delete all of the pages that are contained within it. If you aren't sure that this is what you want to do, try moving the misplaced section to another part of your notebook instead.
If you have OneNote notebooks on SharePoint, you'll notice that they're typically stored in Document Libraries. If the SharePoint Library you're using has certain properties enabled, it could cause sync errors.
For more information, see the following articles:
Sync problems in the collaboration space may occur if a number of students try to edit the same page location at the same time or if a large file attachment is added on the edited page.
Here are some best practices you can follow to avoid these types of sync issues:
-
Separate students into small groups of up to 6 students.
-
Create a separate section for each group of students. For example, if there are 4 groups of 6 students, create 4 sections.
-
Have each student create their own page or have each of them edit in different places on the page.
-
Avoid adding big file attachments.
Here are some of the other sync errors you may experience:
0xE0000021: Need password to sync OneNote
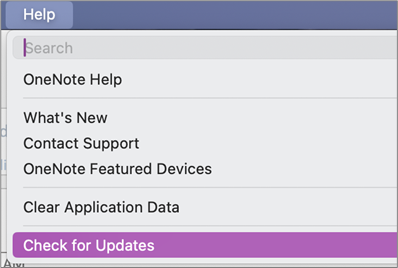
First, make sure you have the latest version of OneNote installed from the Mac App Store.
-
Select Help > Check for Updates.
-
If an update is available, select Update or Update All.
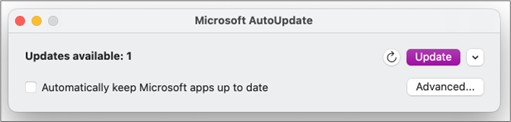
-
OneNote should update automatically.
Next, try resetting your iCloud keychains in macOS
-
From the Keychain Access menu, select Settings.
-
Select Reset My Default Keychains.
-
Quit Keychain Access and log out of your Mac from the Apple menu. Once you have logged back in, save your current login password in a keychain.
-
Open OneNote and try syncing your notebook. If prompted, enter your Microsoft account name and password.
0xE000002E: Resolve the 0xE000002E (Out of Sync with Store) error in OneNote
OneNote needs to refresh but can't do so automatically. This is typically a temporary issue and should resolve itself the next time a full sync occurs. If you don't want to wait for the next automatic sync, you can force a full sync of all open notebooks by pressing Shift+Command+S while OneNote for Mac is running.
0xE40105F9: Resolve the 0xE40105F9 (Unsupported Client Build) error in OneNote
This error can be resolved by updating OneNote for Mac to the latest update. For more information, see Check for Office for Mac updates automatically.
0xE000005E: Resolve the 0xE000005E (ReferencedRevisionNotFound) error in OneNote
This error is typically caused by a temporary issue and should resolve itself the next time a full sync occurs. If you don't want to wait for the next automatic sync, you can force a full sync of all open notebooks by pressing Shift+Command+S while OneNote for Mac is running.
There are a few steps you can follow to avoid OneNote sync issues on a mobile device:
-
Check and make sure OneNote is running in the foreground.
-
Logout and log back in to OneNote to reset your credentials and avoid authentication problems.
-
Force a OneNote to sync
Reset credentials
-
In Microsoft OneNote for iOS, go to Settings on your device:
-
On an iPad, tap the gear icon in the upper right corner.
-
On an iPhone, tap the ellipsis ( ... ) icon and then tap Settings.
Open OneNote, tap the back < icon in the upper-left corner of the screen until you see your list of notebooks, and tap the gear icon next to the account name and email address.
-
-
On the Settings screen, under Account, tap the account name.
-
Tap the account name again and then choose Remove Account.
-
Accept the notification that appears to confirm signing out.
-
Double tap the device's home button, and swipe up on the OneNote app to close it .
-
Start OneNote and sign in to your account.
Force Syncing for iOS
-
There are no options to force sync a notebook in OneNote for iPad or iPhone.
There are a few steps you can follow to avoid OneNote sync issues on a mobile device:
-
Check and make sure OneNote is running in the foreground.
-
Logout and log back in to OneNote to reset your credentials and avoid authentication problems.
-
Force a OneNote to sync
Reset credentials
-
Open OneNote and then on the bottom left, tap Notebooks.
-
Tap the three-dots menu in the upper right corner of the screen, and choose Settings.
-
Tap Account.
-
Tap Sign Out, and then click OK.
-
Tap the recent apps button on the bottom of the screen (the one to the left of your Home button), find the OneNote app and swipe it sideways to close it.
-
Start OneNote and sign in to your account.
Force Syncing for Android phone
-
In OneNote, find the notebook that's experiencing the sync issues.
-
Tap the three-dots menu in the upper right corner of the screen, and choose Sync (account name) notebook.
Tip: To sync all notebooks, go to the list of notebooks. Tap the three-dots menu and then choose Sync all.
-
Leave the device on until the sync is done. You may have to leave the device on overnight, especially in the case of very large notebooks or first-time syncs.
If you are unable to open and view a notebook in OneNote for the web, it's likely a server issue. If your notebook is stored on OneDrive, check the Service Status page for any known interruptions or outages. If your notebook is stored on SharePoint, contact your administrator to report and troubleshoot the problem.
Notebooks not syncing
If you are unable to open and view a notebook in OneNote for the web, it's likely a server issue. If your notebook is stored on OneDrive, check the Service Status page for any known interruptions or outages. If your notebook is stored on SharePoint, contact your administrator to report and troubleshoot the problem.
Issue
When attempting to sync changes to any notebook in Microsoft OneNote for Windows 10, OneNote 2016, OneNote for Mac, OneNote for iOS (iPad and iPhone), or OneNote for Android, the following error may occur:
We ran into a problem syncing your notebook. (Error code: 0xE0000007)
Status
The OneNote product team is actively investigating this issue. We apologize for any inconvenience that this issue may have caused you and will update this article as soon as more information is available.
Meanwhile, we invite you to try any or all of the following workarounds to see if they resolve the issue.
To rule out the most common causes for error 0xE0000007 with OneNote, do the following:
-
Verify that you have good network connectivity for your computer or mobile device by using your browser or another cloud-based app.
-
Force OneNote to sync the current notebook by doing any of the following, depending on the version of OneNote that you’re using:
-
In OneNote for Windows 10, click the Show Notebooks button
-
In OneNote 2016, click File > View Sync Status, and then click Sync Now next to the notebook you want to sync.
Note: If you’re not sure what version of OneNote for Windows you have, see What’s the difference between OneNote and OneNote 2016.
-
In OneNote for Mac, click the Show Notebooks button
-
In OneNote for iOS, pull down the Notebooks list (or the Recent Notes list) to force a sync of all open notebooks. Alternately, you can pull down the section list or page list to force a sync of the current notebook.
-
-
Make sure you are using the latest version of OneNote for your computer or mobile device.
Do any of the following, depending on the version of OneNote that you’re using:
-
In OneNote for Windows 10, click Start, scroll to and then click the Store app. In the Store app, search for OneNote, go to its app page, and then click the Update button, if it is available. (If the button says Launch instead, you have the latest version).
-
In OneNote 2016, click File > Account > Update Options > Update Now.
Note: If you’re not sure what version of OneNote for Windows you have, see What’s the difference between OneNote and OneNote 2016.
-
In OneNote for Mac, open the App Store app, and then click Updates at the top right of the toolbar.
Note: If you installed OneNote for Mac as part of Microsoft Office, see Check for updates in OneNote for Mac.
-
In OneNote for iOS (iPad or iPhone), open the App Store app, and then tap Updates. If a OneNote update is available, tap Update next to it, or tap Update All to update all apps.
-
In OneNote for Android, open the Play Store app, tap the menu icon, and then tap My apps & games. If a OneNote update is available, tap Update next to it, or tap Update All to update all apps.
-
-
Wait to see if the error disappears after a moderate amount of time. In some cases, the error can be caused by a temporary issue with our servers.
Try opening your notes in OneNote for the web
If the previous steps did not resolve the issue for you, check to see if you can view your notebook in OneNote for the web.
-
In your browser, go to www.onedrive.com and sign in with the same account that you use with OneNote.
-
Navigate to the folder where the notebook you want to open is located (typically Documents or Notebooks), and then click the notebook’s name to open it in OneNote for the web.
Depending on the result of these steps, here’s what to do next:
-
If you’re able to open the notebook in OneNote for the web and you see all of your latest changes and edits, then you can use OneNote for the web to finish your work.
-
If you’re able to open the notebook in OneNote for the web but you don’t see all of your latest changes there, make sure you make a copy of the original pages that have not synced to OneNote for the web. To do this, go back to your main OneNote app (OneNote for Windows 10, OneNote 2016, or OneNote for Mac) and copy the pages from the current notebook to any other notebook that is not affected by the 0xE0000007 error. You can then open that notebook in OneNote for the web.
-
If you cannot open the notebook in OneNote for the web while you’re signed in, it means that you don’t have permission to open and edit it. For example, if the notebook is shared with you by someone else through OneDrive or OneDrive for Business, make sure that the owner of the notebook hasn’t revoked your permission to open and edit it.
Close and reopen the notebook or notebooks affected by error 0xE0000007
If the previous steps did not resolve the issue for you, you have the option of closing and reopening your notebooks to force OneNote to resync your notes. You should attempt this only if you have a recent backup of the notes in question.
Warning: Following the steps below may result in loss of data. Specifically, if any of your affected notebooks had unsynced changes pending when you encountered the 0xE0000007 error, you could lose those changes if you proceed. Please understand that if you opt to continue with the steps below, no one can recover the lost information for you, not even Microsoft Technical Support.
If you’re sure that you don’t have any important changes to your notes pending, or if you don’t care about potentially losing any unsynced changes, you can try the following, depending on the version of OneNote that you’re using:
-
In OneNote for Windows 10, click the Show Notebooks button
-
In OneNote 2016, click the name of the current notebook to show the Notebooks bar, right-click the notebook you want to close, and then click Close This Notebook.
Note: If you’re not sure what version of OneNote for Windows you have, see What’s the difference between OneNote and OneNote 2016.
-
In OneNote for Mac, click the Show Notebooks button
After closing any affected notebook, try opening it again. If this does not resolve the issue, you can create a new notebook and then copy the pages and sections from your original notebook (the one affected by the 0xE0000007 error) to the new notebook and then sync your changes there until a permanent solution is found.
Symptom 1 When you use Microsoft OneNote, you receive the following error message in the sync status dialog box for a notebook:
We're sorry. We can't sync this section because you don't have write permissions. Talk to your administrator to resolve the issue. (Error code: 0xE4010071)"
Symptom 2 You cannot open a notebook from a read-only SharePoint Server 2013 site by using OneNote.
Cause This issue occurs because the site was changed to read-only mode for an upgrade. If you are on a server that is being upgraded, this issue might be occurring because your administrator changed the site to read-only mode.
Workaround If you have the notebook open, it will stay in read-only mode until the administrator turns off read-only mode.
If you do not have the notebook open, you may be unable to open it while the site is in read-only mode. We recommend that you ask your administrator to turn off read-only mode. However, if this is not an option, you can follow these steps to work around the issue.
Note This workaround is intended only for users who cannot open the notebook by using OneNote. The workaround lets users access the notebook temporarily. The temporary copy of the notebook cannot receive changes from other users.
-
Open the SharePoint site, and then open the library that contains the notebook.
-
In the Connect & Export area on the LIBRARY tab, click Open with Explorer.
-
Copy the notebook folder that contains the section files to the local computer, and then open the section files by using OneNote.
Issue While attempting to sync, OneNote may display the following error:
-
0xE0000024
Background This error can occur when OneNote does not have the correct account information to open and sync a notebook, or if previously entered account information have expired.
This may be due to any of the following:
-
You’ve recently changed the password for your account.
-
You’re logged in with a different account than the one authorized to use the notebook that you’re trying to open or re-open.
-
You no longer have permission to access to the notebook because its owner has revoked your access to it or because server permissions have been changed.
Resolution To resolve this error, try any of the following:
-
Click the sync error message near the top of the OneNote app window. This attempts to refresh your session, which may resolve the issue without the need to re-enter your account information. If the refresh attempt is unsuccessful, you’ll be prompted for your account information. Sign in with the same account with which the notebook is associated. OneNote will resume syncing as soon as you’re successfully authenticated.
-
Make sure that you’re entering the correct account information — either for your Microsoft account or your work or school account — especially if you have recently changed your account password. If you have recently started to use OneNote on a new device, you may need to first add your account if it is not your default account.
-
Try opening the notebook in OneNote for the web. To do this, open a modern Web browser (such as the latest versions of Microsoft Edge, Chrome, Firefox, or Safari), visit www.onenote.com, click Sign In, and then enter your account information for the same account with which the notebook is associated.
-
If you are able to see the notebook after signing into OneNote for the web, do the following:
-
Close the OneNote app on your computer or device.
-
In your Web browser, visit www.onedrive.com and sign in with the same account with which the notebook is associated. Navigate to the folder where the notebook is stored, and then click the notebook name to open it in the browser.
-
When the notebook opens in your browser, click Open In OneNote to open the notebook in the OneNote app installed on your computer or device.
-
If prompted, sign in with your correct account information when prompted by the OneNote app.
-
-
If you are unable to see the notebook after signing into OneNote for the web, continue troubleshooting in either of the “Additional information” sections below.
-
Additional Information for Windows 10 users If the error persists and you’re still unable to sync after completing the troubleshooting steps listed above, please try the following:
-
Sign out of all accounts associated with OneNote and then sign in again.
-
If your notebook isn’t syncing automatically after you’ve signed back in, right-click the notebook name, and then sync it manually.
-
If the issue still persists and you are asked to sign in multiple times, you can try deleting your stored Microsoft Office account information by following these steps:
-
Close OneNote and any open browser windows.
-
Click the Windows Start button, and then click Settings.
-
In the Find a setting box, start typing Credential Manager, and then click Credential Manager in the search results.
-
In Credential Manager, click Windows Credentials.
-
Scroll down in the list and look for entries whose labels begin with “MicrosoftAccount” and “MicrosoftOffice.” Click the down-facing arrow button next to each of these entries, and then click Remove for each one.
-
Restart your computer or device, launch the Onenote app, and then sign in with your account information when prompted.
-
Additional Information for macOS and iOS users
If the error persists and you’re still unable to sync after trying the troubleshooting steps listed above, please try the following:
-
Check Fixes or workarounds for recent issues in OneNote for Mac, iPhone, and iPad to verify if you’re running into any new sync issues that may have recently been reported for OneNote for Mac or OneNote for iOS.
-
Sign out of all accounts associated with OneNote and then sign in again.
-
If your notebook isn’t syncing automatically after you’ve signed back in, try force-syncing it.
On macOS, Control-click the notebook name, and then sync the notebook.
On iOS, use your finger to pull down the Notebooks list. A spinning progress indicator will appear near the top of the list while OneNote attempts to re-sync all open notebooks.
-
Make sure that you’re using the latest version of OneNote for Mac or OneNote for iOS on your iPhone or iPad.
If none of these steps resolve your issue, please see the ”More help” section near the end of this article about where you can report this issue to the OneNote product team.
Other sync errors
Here are some of the other sync errors you may experience, along with links to troubleshooting articles for those errors:
If you’re seeing the 0xE000002E error code, OneNote needs to refresh but can't do so automatically. This is typically a temporary issue and should resolve itself the next time a full sync occurs. If you don’t want to wait for the next automatic sync, you can force a full sync by pressing Shift+F9 while OneNote is running.
More help
If you’re still seeing this error message after performing a manual sync, please report this issue in the OneNote forums on Microsoft Answers so we can investigate the cause and find a solution.
If you are seeing the 0xE4010641 error code, OneNote can't sync one or more notebooks because you're disconnected from the network or the network location where your notebooks are stored isn't available.
Your notebook is most likely stored on OneDrive, SharePoint or a local network location. When OneNote can't access these locations, it could be because of any of the following reasons:
-
You may be experiencing intermittent, temporary network or server connectivity issues. Wait a few minutes and try syncing your notebooks manually. You can do this by pressing SHIFT+F9 or clicking the Sync Now button in the Notebook Sync Status dialog box.
-
The server where your notebooks are stored has gone offline temporarily. If you're syncing to a SharePoint site or a local network share in your organization, someone may have turned the machine off or taken it down for maintenance. Check to see if you can access the root address of the server to verify the outage or talk to your SharePoint or IT administrator to confirm or report the issue.
-
Your notebook no longer exists at the network location. This could happen if you (or someone else with permissions to your notebook) deleted the notebook file from the server. If your notebook is stored on OneDrive, go to the OneDrive home page, log in (if prompted), and then check to see if your notebook still exists. If you're unsure about where your notebook is stored, go to File > Info in OneNote to find the address of your notebook.
If you’re seeing the 0xE40105F9 error code, OneNote can't sync one or more notebooks because you’re using an older version of OneNote that's no longer supported by the server.
To continue syncing your notes, download the latest updates for OneNote, and then try again.
OneNote 2013 desktop version
Do the following:
-
Exit OneNote 2013.
-
Go to Control Panel > System & Security > Windows Update.
-
Click Check for Updates.
-
Select and install all available updates that appear under Microsoft Office.
-
If necessary, restart your computer after all of the updates have been applied.
-
Start OneNote 2013 and then sync your notebooks manually by pressing Shift+F9.
If you don’t have Windows Update configured to include updates for Microsoft Office, you can manually check for OneNote updates by doing the following:
-
Start OneNote 2013.
-
Go to File > Account.
-
Click Check for Updates.
OneNote Mobile
Do the following:
-
Exit OneNote Mobile.
-
Check the app store or marketplace for your phone or device to see if any OneNote Mobile updates are available.
-
Download and install all any available OneNote updates.
-
Restart OneNote Mobile and try syncing your notebooks again.
More help
If you're still seeing this error message after troubleshooting it, please report this issue in the OneNote forums on Microsoft Answers so we can investigate the cause and find a solution.
You may see the 0xE4020045 error code in OneNote 2016 or 2013 after clicking a yellow Info Bar that appears when a locally stored notebook was dragged (or otherwise added) to OneDrive for the purpose of backing it up, syncing it, or sharing it. While this may give the appearance that the notebook is now a cloud-based notebook, OneNote will continue to treat it as a locally stored notebook unless the notebook is properly moved to OneDrive.
You can try to resolve this issue by doing the following:
-
Exit OneNote, if it is still running.
-
On your computer’s hard drive, navigate to the folder in which the affected notebook is stored.
Tip: Typically, the default location for locally stored OneNote for Windows notebook folders is C:\Users\ <username>\Documents\OneNote Notebooks .
-
Copy the folder with the same name as the affected notebook to the root folder of your main hard drive.
Doing this effectively removes the copy of the notebook out of OneDrive’s sync scope.
-
In Windows File Explorer, click This PC, double-click to open the hard drive root location to which you just copied the notebook in the previous step, and then double-click the folder with the name of the copied notebook.
-
In the copied notebook folder, double-click the Open Notebook.onetoc2 file.
If this file is not present, double-click any other available *.onetoc2 file in this folder.
-
When OneNote 2016 for Windows opens, the notes from the copied notebook folder should now be displayed properly.
To prevent this issue from happening again, we strongly recommend that you follow the required procedure for properly moving the original affected notebook to your OneDrive account, which will convert it from a locally stored notebook to a true cloud-based notebook. Your cloud-based notes will still be private, but you’ll enjoy more reliable syncing and you’ll be able to access your notes from any mobile device or any Web browser that you use.
For more information, see Move a OneNote for Windows notebook to OneDrive. The instructions in this article also apply if you’re using older versions of OneNote for Windows, such as OneNote 2013 or 2010.
If you’re seeing the 0xE000005E error code, OneNote can't sync a section in one of your notebooks. This error is usually temporary. You can try to resolve it by pressing Shift+F9 to manually sync the notebook.
If you keep getting this error, even after trying to sync several times, do the following:
-
Right-click the name of your notebook, and then click Notebook Sync Status.
-
To the left of the notebook experiencing the error, click the small arrow next to the notebook icon.
-
Make note of the notebook section that’s causing the issue. Its name is displayed immediately above the box containing the error message.
-
Click Close to dismiss the Shared Notebook Synchronization dialog box.
-
Create a new section in the same notebook as the section containing the error.
-
Copy or move all of the pages from the old section that’s not syncing to the new section you just created.
-
Delete the old section and then re-sync your notebook by pressing Shift+F9.
This issue has been fixed as part of a recent product update. Make sure to run Windows Update on your computer to download and install all available updates for Microsoft Office.
More help
If you’re still seeing this error message after troubleshooting it, please report this issue in the OneNote forums on Microsoft Answers so we can investigate the cause and find a solution.
If you’re seeing the 0xE0190193 error code, you’re trying to access a shared notebook or section that is no longer available to you. This can happen when the owner of the notebook (or the server administrator) intentionally or accidentally changes your permissions.
To resolve this issue, contact the owner of the shared notebook you’re trying to use and ask them to check your permissions to view and edit the notebook.
Need more help?
Best practices for syncing notes in OneNote
Help us improve on this experience and send diagnostic information by reporting the issue via Help> Feedback. Note: We are not able to respond through this channel.
Get help from the community on the OneNote forums on Microsoft Answers.


Need more help?
Want more options?
Explore subscription benefits, browse training courses, learn how to secure your device, and more.


Communities help you ask and answer questions, give feedback, and hear from experts with rich knowledge.


Find solutions to common problems or get help from a support agent.
